
You make beeswax candles by melting filtered beeswax to 160-175°F, securing a cotton or hemp wick in your chosen vessel, pouring the wax slowly, and allowing it to cool completely. The process requires basic equipment like a double boiler, thermometer, wick centering tools, and quality beeswax sourced from sustainable beekeepers.
Beeswax offers distinct advantages over paraffin or soy alternatives. The material burns longer, emits a subtle honey scent, and produces negative ions that may purify air. Candle makers prize its natural origin and the warm glow it creates when burned.
What materials do you need to make beeswax candles?
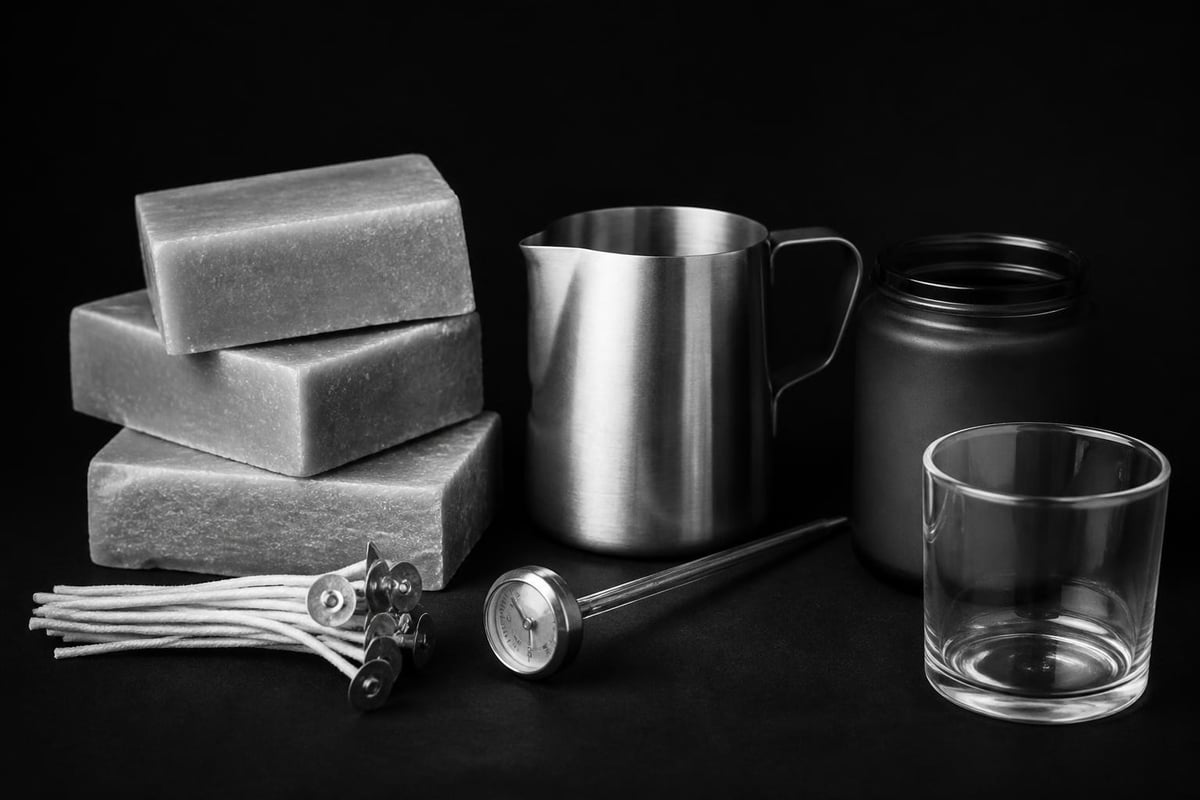
You need beeswax (blocks, pellets, or cappings), pre-tabbed wicks sized for your container diameter, a pouring pot or double boiler, a thermometer, wick-centering devices, containers or molds, and optional additives like coconut oil to adjust hardness. Quality materials determine your final product's burn quality and appearance.
Essential equipment and supplies
Core materials:
- Filtered beeswax (1 pound makes approximately two 8-ounce candles)
- Cotton or hemp wicks with metal tabs
- Heat-resistant containers (glass, ceramic, or metal)
- Pouring pitcher or dedicated wax melter
- Candy or candle thermometer (150-200°F range)
Supporting tools:
- Wick centering bars or clothespins
- Scissors for wick trimming
- Newspaper or protective surface covering
- Optional: scale for precise measurements
- Optional: wooden skewers for releasing air bubbles
The Penn State Extension beekeeping resources provide background on how hive products reach candle makers. Sustainable sourcing matters both ethically and for wax quality.
Selecting the right beeswax grade
Beeswax comes in three primary forms: blocks, pellets, and cappings. Blocks require breaking or grating before melting. Pellets melt uniformly and measure easily. Cappings (the wax scraped from honeycomb frames) cost less but need thorough filtering.
Color ranges from pale yellow to deep amber depending on the flowers bees visited and the wax's age. Darker wax often carries stronger honey notes. Filtered cosmetic-grade beeswax produces the cleanest burn with minimal smoke.
Good beekeeping practices ensure the wax you purchase supports sustainable apiculture. Ask suppliers about their sourcing and whether they test for pesticide residues.
How do you make beeswax candles using the container method?
You make beeswax candles in containers by securing a wick to the vessel bottom, melting wax to the correct temperature, pouring slowly around the centered wick, and allowing 24-48 hours of cooling time before trimming and burning. This method suits beginners and produces consistent results with minimal waste.
Preparing your workspace and containers
Clean containers thoroughly with soap and water, then dry completely. Any moisture will cause bubbles or cracking. Warm containers slightly (place in a 150°F oven for 10 minutes) to prevent temperature shock when hot wax hits cold glass.
Set your workspace on a level surface covered with newspaper. Keep a fire extinguisher nearby and never leave melting wax unattended. Adequate ventilation prevents wax vapor buildup.
Step-by-step pouring process
- Calculate wax needed (containers hold roughly half their volume in wax by weight)
- Melt beeswax in a double boiler, monitoring temperature closely
- Attach wick tab to container center using a dab of melted wax or wick sticker
- Heat wax to 160-175°F, no higher than 185°F to preserve natural properties
- Remove from heat and let cool to 155-165°F for optimal pouring
- Pour slowly down the container side to minimize bubbles
- Reserve 10% of wax for topping off after initial cooling
- Center wick using a clothespin or wick bar laid across the rim
- Allow to cool at room temperature for 6-8 hours
- Reheat reserved wax and fill the sink hole that forms around the wick
- Let cure for 24-48 hours before trimming wick to 1/4 inch
Temperature control prevents cracking and sink holes. Utah State University's guide on processing and using beeswax explains how proper wax preparation affects final candle quality.
| Temperature | Purpose | Result |
|---|---|---|
| 145°F | Minimum melting point | Incomplete melt, grainy texture |
| 160-175°F | Optimal pouring range | Smooth finish, minimal shrinkage |
| 185°F+ | Too hot | Discoloration, loss of honey scent |
What methods work for making rolled beeswax candles?
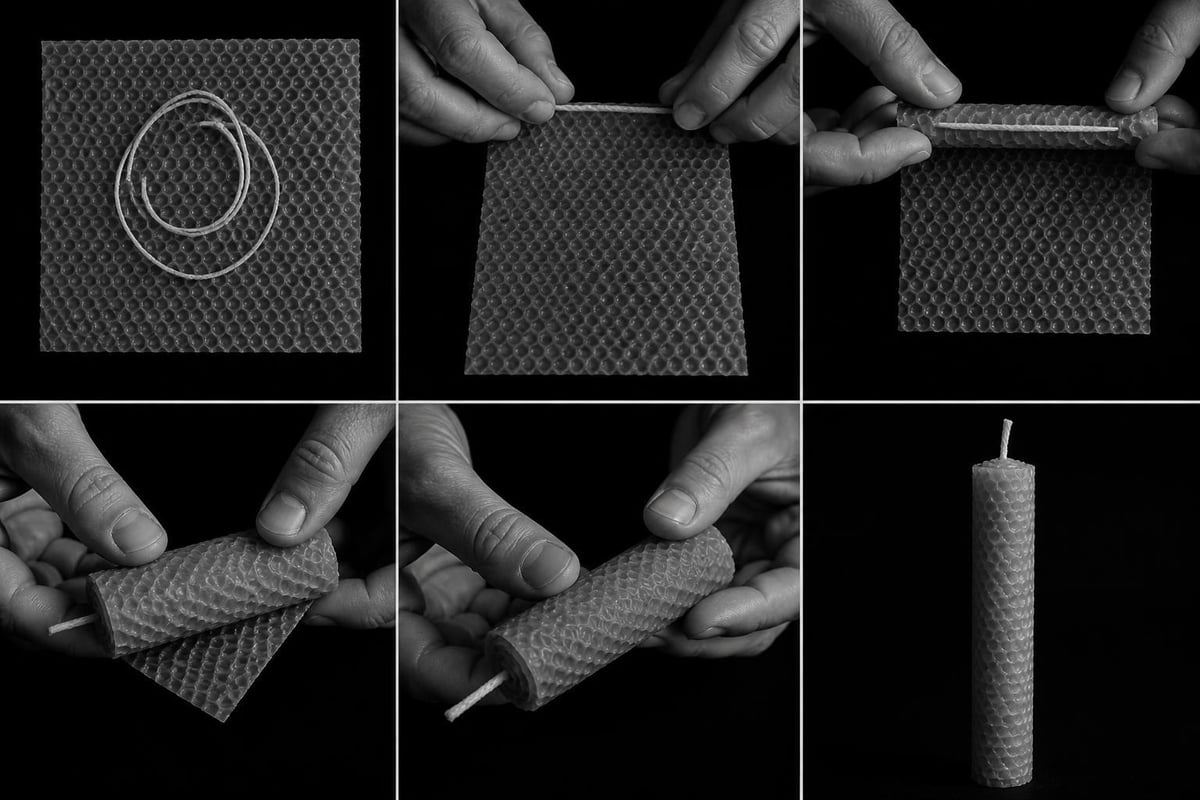
Rolling beeswax sheets creates candles without melting or pouring, making it the safest method for beginners and children. You warm pliable beeswax sheets slightly, press a wick along one edge, and roll tightly to form a taper or pillar candle in minutes.
This technique requires only beeswax foundation sheets (available from beekeeping suppliers), pre-tabbed wicks, scissors, and optionally a hair dryer for warming. The honeycomb pattern remains visible, adding textural interest.
Rolling technique instructions
Cut your beeswax sheet to the desired candle height. Standard foundation comes in 8x16 inch sheets. For a 6-inch taper, cut the sheet lengthwise.
- Warm the sheet gently with a hair dryer or in sunlight until pliable (not melted)
- Lay wick along the short edge, leaving 1/4 inch extending beyond the top
- Fold the edge over the wick and press firmly
- Roll tightly and evenly, keeping edges aligned
- Press the final edge into the candle body to seal
- Trim wick to 1/4 inch
Rolling produces instant candles ideal for gifts or quick projects. The method wastes no wax and requires no cleanup.
How do you make beeswax candles in molds?
Molded beeswax candles require releasing agents, precise temperature control, and patience during unmolding. You coat the mold interior with mold release, secure the wick through the bottom hole, pour wax at 160-170°F, cool completely (often 12-24 hours), and carefully remove the finished candle.
Mold selection and preparation
Mold materials:
- Metal (tin, aluminum) conducts heat evenly and releases easily
- Silicone flexes for simple unmolding of complex shapes
- Polycarbonate plastic offers clarity to monitor fill level
- Avoid glass, which may crack from temperature changes
Spray or brush mold release (or use cooking spray) on all interior surfaces. Thread wick through the bottom hole and secure with mold putty or a wick screw. Pull taut and secure the top end to a skewer laid across the mold opening.
Addressing common molding challenges
| Challenge | Cause | Solution |
|---|---|---|
| Air bubbles | Pouring too quickly | Pour slowly, tap mold sides, use skewer to release |
| Cracking | Cooling too fast | Insulate mold, avoid drafts or cold surfaces |
| Difficult release | Insufficient mold release | Apply generous coating, chill briefly before unmolding |
| Sink holes | Wax shrinkage | Save wax for second pour after initial cooling |
Pour temperature matters more with molds than containers. Too hot and the candle may not release cleanly. Too cool and you get surface imperfections. The 160-170°F range balances these concerns.
What is the best wick size for beeswax candles?
The correct wick diameter depends on your container width, wax blend, and desired burn time. Beeswax burns hotter than soy or paraffin, requiring a smaller wick than you might expect. A 3-inch diameter container typically needs a #4 or #5 square-braided cotton wick.
Wick selection guidelines
Test burns determine optimal wick size for your specific setup. The ideal wick creates a melt pool reaching the container edge within 2-3 hours without producing excess smoke or a flame taller than 1 inch.
Wick types for beeswax:
- Square-braided cotton (most common, consistent curl)
- Hemp (slower burn, minimal smoke)
- Cotton with paper core (rigid, self-centering)
- Wooden (aesthetic choice, requires wider sizing)
Pre-tabbed wicks save time but limit length flexibility. Wick-by-the-roll allows custom sizing for various container heights. Always leave at least 1/2 inch clearance between wick bottom and container base.
How do you troubleshoot beeswax candle problems?
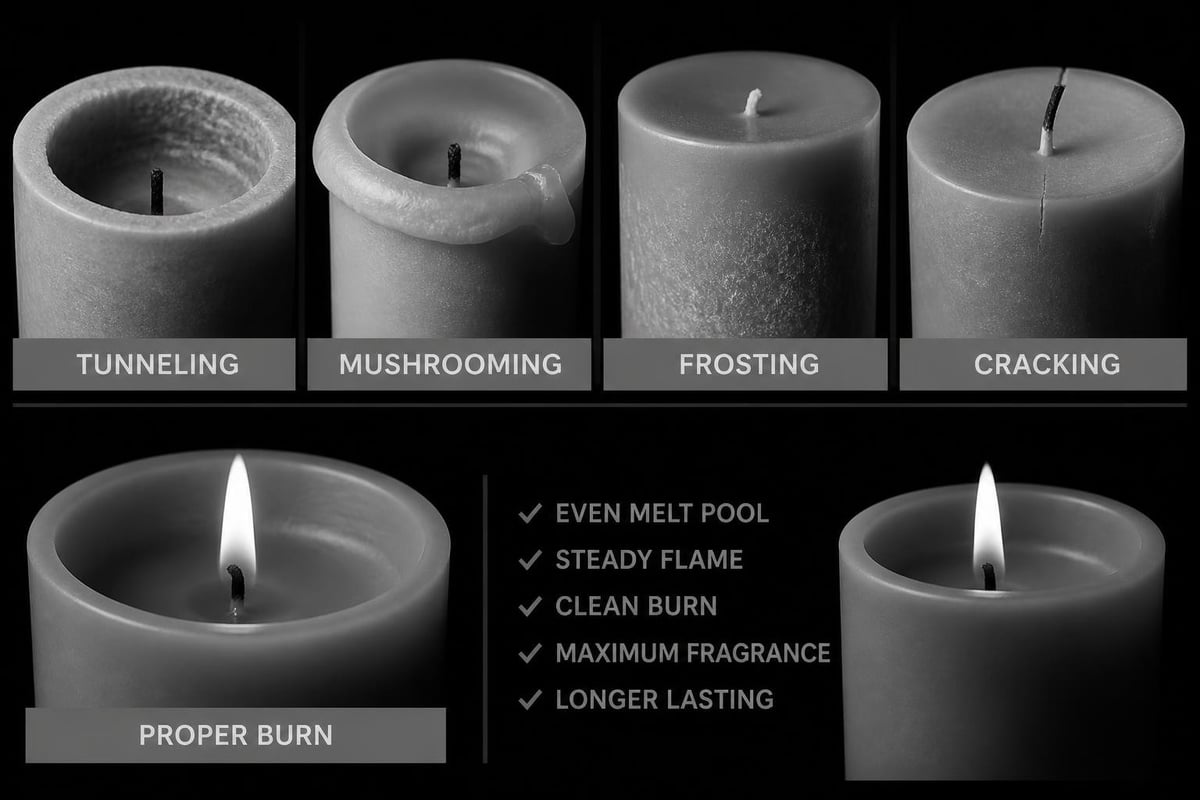
Common issues include tunneling (wick too small), mushrooming (wick too large), frosting (cosmetic white film), and cracking (cooling too rapidly). Each problem stems from controllable variables in materials, temperature, or technique.
Solving burn and appearance issues
Tunneling occurs when the melt pool fails to reach the container edge. Burn the candle long enough during each use (minimum 1 hour per inch of diameter) or switch to a larger wick. Wrapping aluminum foil around the rim during burning can rescue a tunneling candle by reflecting heat inward.
Frosting appears as a white, crystalline bloom on beeswax surfaces. This natural characteristic does not affect burn quality. Prevent it by pouring at lower temperatures (155-160°F) or adding 10% coconut oil to your wax blend.
Sooting indicates poor wick choice or excessive additives. Switch to cotton or hemp wicks and ensure proper wick trimming before each burn. The ASTM fire safety standards provide testing protocols for flame height and smoke production.
Can you add scent or color to beeswax candles?
You can add botanical essential oils at 6-8% by weight after removing wax from heat, though beeswax's natural honey scent often stands alone. Avoid fragrance oils, which may contain synthetics incompatible with the natural wax composition. For color, use wax-soluble dyes sparingly, as they can affect burn quality.
Many candle makers prefer beeswax unadorned. The material's pale gold color and subtle aroma need no enhancement. At Haus of Smell, hand-poured botanical candles use real plant and resin extracts rather than synthetic fragrance, maintaining the integrity natural wax deserves.
Adding botanicals safely
Mix essential oils thoroughly into wax at 160°F or below to preserve aromatic compounds. Higher temperatures volatilize delicate molecules. Citrus oils evaporate quickly while woodsy or resinous scents anchor better.
Test small batches before committing to large pours. Some essential oils accelerate burn rate or produce excessive smoke. Lavender, chamomile, and cedarwood work reliably with beeswax chemistry.
For those exploring DIY candle kit options, pre-measured botanical additions simplify the scenting process while maintaining natural ingredient standards.
How long do beeswax candles take to cure?
Beeswax candles benefit from 24-48 hours of curing before burning, though they solidify within 6-8 hours of pouring. Curing allows the crystalline structure to stabilize, the wick to fully saturate with wax, and any residual moisture to evaporate. Longer cure times (up to one week) improve burn quality and scent throw.
Store curing candles at room temperature away from direct sunlight. Cover loosely with paper to prevent dust accumulation while allowing air circulation. Patience during this phase prevents wick drowning and ensures even initial burns.
What safety considerations apply to making beeswax candles?
Never heat beeswax above 200°F, as it becomes flammable at higher temperatures. Use a thermometer rather than guessing. Keep a fire extinguisher rated for grease fires within reach. Water worsens wax fires by spreading burning liquid.
Work in a ventilated area to disperse wax vapors. Wear long sleeves to protect against splashes. Keep pets and children away from the work surface. Clean spills immediately with paper towels, then wash with hot soapy water.
Store finished candles away from heat sources and direct sunlight. Educate users to trim wicks before each burn, never leave candles unattended, and place them on heat-resistant surfaces away from flammable materials.
How do you store and care for finished beeswax candles?
Store beeswax candles in a cool, dark location between 60-75°F. Excessive heat softens wax while freezing temperatures make it brittle. Wrap individually in tissue paper to prevent surface scratching and dust accumulation.
Bloom (white frosting) may develop over time. Buff gently with a soft cloth or warm slightly with a hair dryer to restore sheen. This cosmetic change does not affect burn performance.
Before burning, trim wicks to 1/4 inch. Burn long enough to establish a full melt pool (preventing tunneling) but never exceed 4 hours continuously. Extinguish by dipping the wick into melted wax with a metal tool, then straighten it upright.
FAQ
How much beeswax do you need per candle?
You need approximately 0.5 ounces of beeswax per ounce of container volume, so an 8-ounce jar requires 4 ounces of wax by weight. Beeswax weighs less than water, filling roughly half the container volume. Always purchase 10-15% extra to account for topping off sink holes during cooling.
Can you reuse beeswax from old candles?
You can remelt and reuse pure beeswax candles by removing old wicks and filtering the wax through cheesecloth. Heat to 160°F, strain into a clean container, and allow to solidify. Previously scented or colored wax may retain traces. Mix with fresh beeswax at a 1:3 ratio for best results.
Why do beeswax candles cost more than paraffin?
Beeswax costs more because production is limited by hive productivity and requires labor-intensive harvesting and filtering. Bees produce only 1-2 pounds of wax per 100 pounds of honey harvested. The natural material offers superior burn time and air-purifying properties that justify premium pricing for quality-conscious buyers.
How long does a beeswax candle burn?
A pure beeswax candle burns approximately 1 hour per 1 ounce of wax. An 8-ounce container candle provides 8-10 hours of burn time. Beeswax burns slower and hotter than soy or paraffin due to its higher melting point and density. Proper wick sizing and trim habits extend burn duration significantly.
Do you need to add anything to beeswax for candles?
Pure beeswax requires no additives for successful candle making. Some makers add 10-20% coconut oil to soften the wax slightly or reduce frosting. Stearic acid increases opacity. These additions are optional. Many prefer working with 100% beeswax to preserve natural benefits and maintain ingredient transparency.
What temperature kills the natural properties of beeswax?
Temperatures above 185°F begin degrading beeswax's beneficial enzymes and aromatic compounds while oxidizing vitamins naturally present in the wax. The optimal melting and pouring range of 160-175°F preserves these elements. Using a reliable thermometer protects your investment in quality beeswax and ensures the finished candles retain the material's natural advantages.
Making beeswax candles rewards patience with long-burning, naturally fragrant results that synthetic alternatives cannot replicate. The process demands attention to temperature and materials but remains accessible to beginners willing to invest in quality supplies. For those in Manhattan seeking botanical candles crafted with the same commitment to natural ingredients, Haus of Smell hand-pours every candle in NoMad using real plant extracts and techniques that honor traditional methods while embracing vegan formulations.