
You can make scented candles at home by melting natural wax to approximately 185°F, adding botanical fragrance oils at the correct temperature, securing a wick in your chosen container, and pouring the wax carefully. The process requires basic equipment, attention to temperature, and patience during the curing period to achieve professional results.
Making candles at home offers creative control over ingredients, scent profiles, and vessel choices while building practical skills. The craft has grown considerably in recent years as more people seek alternatives to mass-produced products. This guide walks through materials, methods, and safety considerations for creating botanical scented candles in your own kitchen.
What supplies do I need to make scented candles at home?
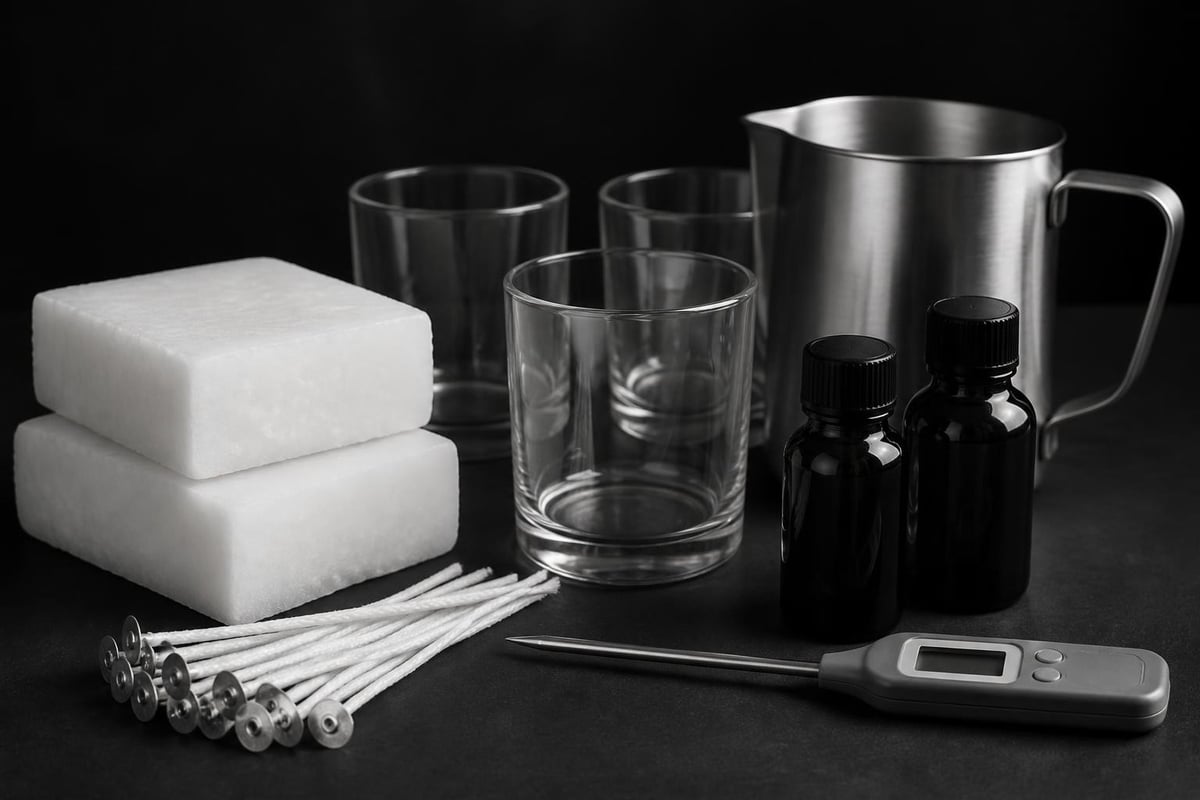
You need wax, wicks, containers, fragrance oils, a double boiler or dedicated melting pot, a thermometer, and measuring tools. The quality of your supplies directly impacts the final product's burn quality, scent throw, and overall performance.
Essential supplies include:
- Natural wax (soy, beeswax, coconut, or blends)
- Pre-tabbed wicks sized for your container diameter
- Heat-resistant containers (glass, ceramic, or metal)
- Botanical fragrance oils or essential oils
- Digital thermometer (preferably one that reads to 200°F)
- Double boiler or pouring pitcher
- Scale for precise measurements
- Wick centering devices or wooden skewers
- Adhesive wick stickers or hot glue
Optional but helpful tools include a heat gun for smoothing surfaces, label materials, and protective equipment like heat-resistant gloves. Many beginners start with pre-made kits, but sourcing individual components allows greater customization and typically yields better results for those serious about the craft.
Storage matters as much as initial purchase. Keep wax in a cool, dry location away from direct sunlight. Store fragrance oils in dark glass bottles with tight seals to preserve their aromatic integrity over time.
How do I choose the right wax for homemade candles?
The right wax depends on your priorities: soy wax offers clean burning and excellent scent throw, beeswax provides natural air purification, and coconut wax delivers superior fragrance retention. Each wax type has distinct melting points, contraction rates, and blending characteristics.
| Wax Type | Melting Point | Best For | Considerations |
|---|---|---|---|
| Soy | 120-180°F | Container candles, beginners | Can develop frosting (cosmetic issue only) |
| Beeswax | 144-147°F | Pillars, natural aesthetic | Higher cost, naturally honey-scented |
| Coconut | 100-107°F | Luxury candles, strong scent throw | Premium price point, soft texture |
| Paraffin | 130-150°F | Traditional candles | Petroleum-based, not botanical |
Soy wax remains the most popular choice for home candle makers due to its forgiving nature and wide availability. It holds fragrance well and burns cleanly without producing significant soot. The natural composition appeals to those seeking plant-based alternatives.
Beeswax carries inherent benefits beyond simple wax properties. Penn State Extension research on beeswax products details how rendering and using beeswax supports sustainable agriculture. The wax naturally purifies air when burned through negative ion release, though it does add a subtle honey note that may compete with added fragrances.
Blending waxes creates hybrid properties. A common blend combines 80% soy with 20% coconut for improved scent throw while maintaining clean burning characteristics. Experimentation helps identify the formula that matches your aesthetic and performance goals.
What fragrance oils work best for scented candles?
Botanical fragrance oils formulated specifically for candle making work best because they remain stable at high temperatures and disperse evenly through wax. Essential oils can be used but require higher concentrations and careful selection since some evaporate quickly when heated.
The fragrance load (percentage of oil to wax) typically ranges from 6% to 10% by weight. Lower percentages suit subtle scents, while stronger fragrances require amounts closer to the upper limit. Testing remains essential since each oil behaves differently in various wax types.
Key considerations for fragrance selection:
- Flash point above your wax pouring temperature
- Compatibility with your chosen wax type
- Intended scent strength and room size
- Safety data and allergen information
- Natural versus synthetic composition
Understanding fragrance safety standards from IFRA helps ensure your candles meet international guidelines for safe use. The organization publishes restrictions and maximum usage levels for various fragrance materials in consumer products.
For those committed to fully botanical candles, Haus of Smell's hand-poured candles demonstrate how real plant and resin extracts create complex scent profiles without synthetic additives. Their Manhattan workshop uses only natural ingredients, proving that botanical doesn't mean limited in fragrance depth or throw.
Testing fragrance combinations before committing to large batches saves materials and disappointment. Keep detailed notes on percentages, wax types, and resulting scent strength for future reference.
How do I make scented candles at home step by step?
Making scented candles at home follows a systematic process: prepare your workspace, measure ingredients, melt wax to the proper temperature, add fragrance, secure wicks, pour carefully, and allow adequate curing time. Following each step precisely produces consistent, professional results.
Step 1: Prepare Your Workspace and Materials
Set up in a well-ventilated area with a flat, heat-resistant surface. Cover the work area with newspaper or protective material. Gather all supplies before beginning since timing matters once wax melts. Clean containers thoroughly and dry completely to prevent water from causing sputtering or poor adhesion.
Step 2: Measure and Melt the Wax
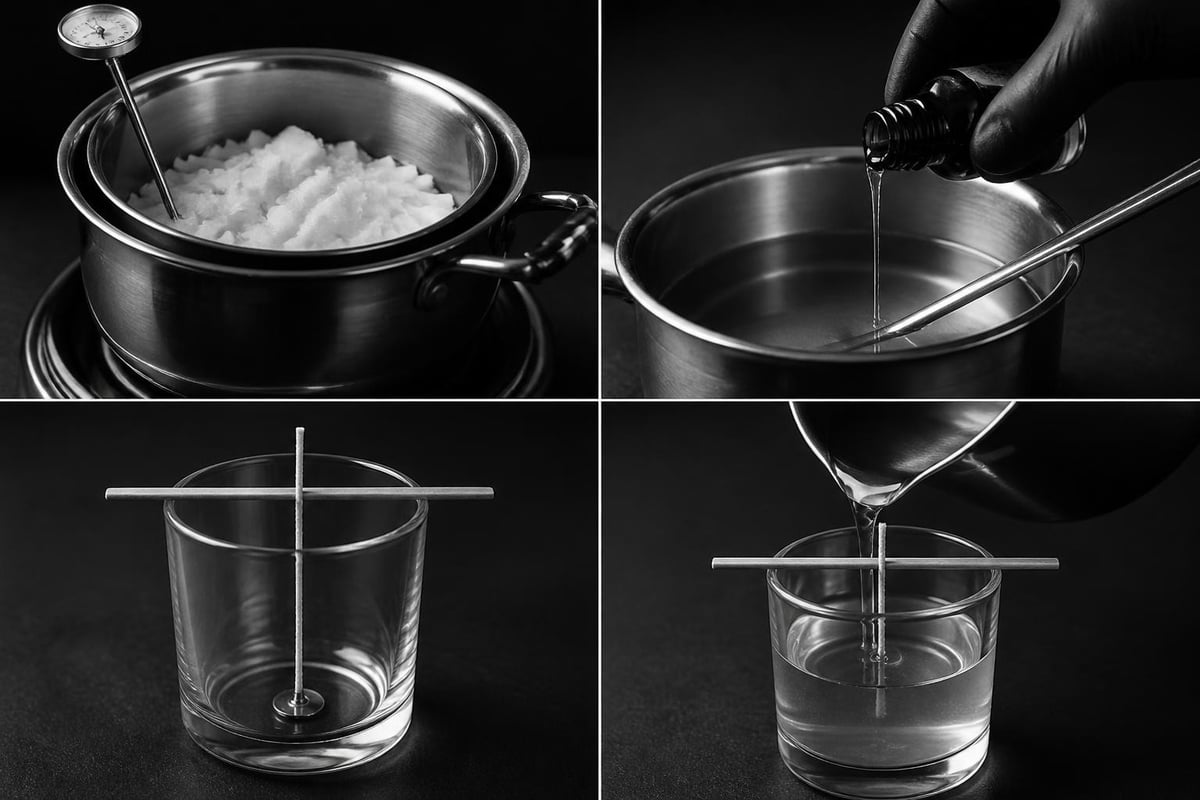
Weigh your wax based on container volume. A general rule estimates that wax volume equals approximately 20% more than the container's liquid capacity due to density differences. Place wax in a double boiler or pouring pitcher set over simmering water. Heat gradually, monitoring temperature with a thermometer.
Step 3: Add Fragrance at the Correct Temperature
Remove wax from heat once it reaches 185°F. Allow it to cool to the manufacturer's recommended fragrance addition temperature (typically 175-185°F for soy wax). Add measured fragrance oil and stir gently for two minutes, ensuring complete integration without introducing excessive air bubbles.
Step 4: Prepare and Secure the Wick
Attach the wick tab to the container bottom using a wick sticker or small amount of hot glue. Center the wick using a wick centering device or by laying a wooden skewer across the container top, securing the wick upright. The wick must remain centered throughout the pour and cooling process.
Step 5: Pour the Wax
Pour wax slowly at approximately 135-145°F for soy wax (temperature varies by wax type). Pour down the side of the container initially to minimize air bubbles. Fill to desired level, leaving at least half an inch from the rim. Reserve a small amount of wax for topping off if sink holes develop during cooling.
Step 6: Cool and Cure
Allow candles to cool undisturbed at room temperature for 24-48 hours. Avoid moving them during this period. If sink holes form around the wick, reheat reserved wax and carefully pour to fill the depression. Full cure takes 1-2 weeks, during which the wax and fragrance fully bind. Burning before complete cure results in diminished scent throw.
What are common mistakes when making candles at home?
Common mistakes include incorrect wick sizing, adding fragrance at improper temperatures, pouring too hot or cold, and insufficient curing time. Each error affects burn quality, scent throw, or candle appearance, but most are easily corrected with knowledge and attention to detail.
Frequent errors and their solutions:
-
Wick too large or small - Results in tunneling (small wick) or excessive smoking (large wick). Test burn for 3-4 hours to verify proper melt pool reaching container edges.
-
Adding fragrance above 185°F - Evaporates volatile compounds, weakening scent. Always check manufacturer specifications and use a reliable thermometer.
-
Pouring temperature too high - Creates sink holes, frosting, and poor glass adhesion. Follow wax-specific guidelines, typically 135-145°F for soy.
-
Insufficient stirring - Fragrance settles unevenly, causing inconsistent scent. Stir gently but thoroughly for at least two minutes.
-
Moving candles during cooling - Disturbs wax structure, creating cracks or uneven surfaces. Leave undisturbed for 24 hours minimum.
Rushing the curing process represents perhaps the most common and impactful mistake. Uncured candles appear finished but haven't achieved proper molecular bonding between wax and fragrance. The result is weak scent throw and poor burn characteristics despite technically correct production.
Temperature control throughout the process cannot be overstated. Invest in a quality digital thermometer rather than relying on visual cues or approximation. The few degrees difference between optimal and suboptimal temperature significantly impacts final quality.
How do I ensure my homemade candles are safe?
Ensuring homemade candle safety requires following fire safety guidelines, using appropriate materials, testing burn characteristics, and understanding labeling requirements for fragranced products. The National Fire Protection Association provides candle safety statistics and practices that inform safe candle making and use.
Safety checklist for homemade candles:
- Use properly sized wicks to prevent excessive flame height
- Ensure containers are heat-resistant and stable
- Keep first burn to 3-4 hours maximum
- Trim wicks to 1/4 inch before each use
- Never leave burning candles unattended
- Place on stable, heat-resistant surfaces away from flammables
- Follow fragrance load recommendations (typically 6-10%)
- Label candles with burn instructions and warnings
The U.S. Fire Administration's candle fire prevention guidance emphasizes proper placement and supervision. Understanding these principles helps create products that enhance spaces safely rather than introducing hazards.
Testing remains non-negotiable for serious candle makers. Conduct burn tests monitoring flame height, smoke production, tunneling, and fragrance throw. Record observations every hour for at least four hours. Professional makers reference voluntary standards like ASTM F2417, which specifies fire safety test methods for candles.
For those planning to sell candles, understanding CLP labeling requirements for fragranced products becomes essential. Even home crafters benefit from knowing allergen disclosure and safety data considerations that protect users.
How do I troubleshoot problems with homemade candles?
Troubleshooting begins with identifying the specific issue: tunneling, frosting, poor scent throw, wet spots, or cracking. Each problem traces to particular causes related to wax type, temperature, wick size, or environmental factors during cooling.
| Problem | Likely Cause | Solution |
|---|---|---|
| Tunneling | Wick too small | Size up wick; ensure first burn reaches edges |
| Frosting | Natural soy characteristic | Accept as aesthetic; reduce cooling rate |
| Weak scent | Insufficient fragrance or cure | Increase load to 8-10%; allow full cure time |
| Wet spots | Poor adhesion to glass | Pour at recommended temp; preheat containers |
| Cracking | Cooling too quickly | Slow cooling rate; avoid drafts |
| Smoking | Wick too large or untrimmed | Size down wick; trim to 1/4 inch |
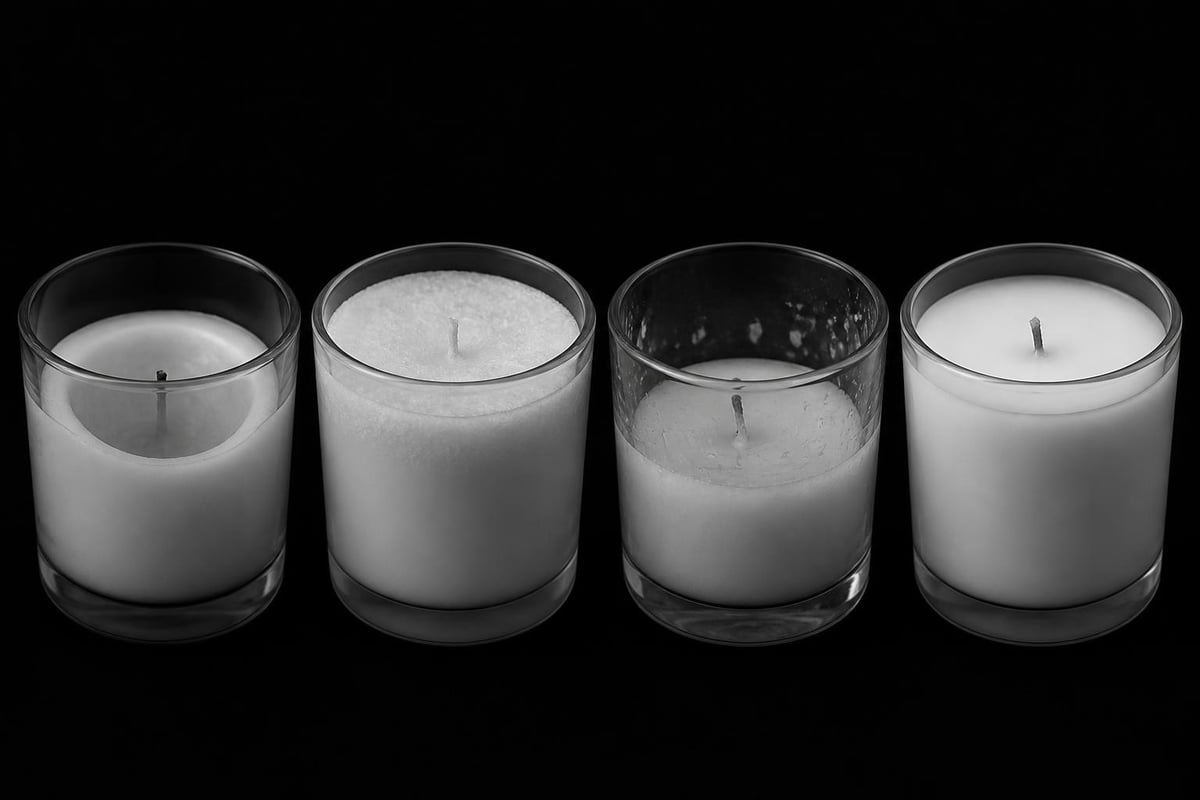
Wet spots, where wax appears to separate from container sides, represent a purely cosmetic issue that doesn't affect burn quality or safety. They result from temperature fluctuations during cooling or pouring at incorrect temperatures. Pre-heating containers to approximately 100°F before pouring minimizes this occurrence.
Frosting appears as a white, crystalline coating on soy wax candles. This natural characteristic occurs as the wax cures and doesn't indicate a defect. Some makers embrace frosting as evidence of natural wax, while others minimize it by controlling cooling rates or adding small amounts of other waxes to the blend.
Scent throw issues frustrate beginners most frequently. Cold throw (scent when unlit) differs from hot throw (scent when burning). Weak hot throw typically indicates insufficient fragrance load, incompatible fragrance and wax pairing, or inadequate cure time. Adjusting these variables systematically helps identify the specific cause.
Can I make candles with recycled or repurposed materials?
You can make candles with recycled containers and leftover wax, but wicks should always be new to ensure proper burn characteristics and safety. Repurposing materials reduces waste while creating unique vessels, though certain considerations ensure successful results.
Suitable containers for repurposing:
- Heat-resistant glass jars (mason jars, cleaned candle vessels)
- Ceramic cups and bowls without cracks
- Metal tins and containers
- Vintage teacups (test heat tolerance first)
- Cleaned food jars with labels removed
Avoid containers with narrow openings, plastic components, or unknown heat tolerance. Test questionable vessels by filling with very hot water and monitoring for several hours. Cracks, excessive heat transfer, or structural weakness indicate unsuitability for candle making.
Recycling wax from old candles requires removing wicks and debris before remelting. Place old candles in a freezer for several hours, which causes wax to contract and release from containers. Melt reclaimed wax in a double boiler, strain through cheesecloth to remove particles, and use within your standard process. Note that previously scented wax carries fragrance memory that may conflict with new additions.
The environmental benefits of repurposing align with sustainable practices. Combining recycled materials with botanical ingredients creates products with minimal environmental impact. This philosophy extends beyond home crafting to commercial production, where thoughtful sourcing and natural formulations reduce ecological footprint.
What advanced techniques improve homemade candles?
Advanced techniques include layering colors, creating custom fragrance blends, embedding botanicals, using specialty wicks, and developing signature vessel selections that elevate candles beyond basic craft projects. Mastery comes through experimentation and systematic testing.
Layering requires patience and temperature management. Pour the first layer and allow it to set partially (developing a skin but still slightly tacky) before adding the next. This creates visible separation while maintaining structural integrity. Each layer can feature different fragrances, creating evolving scent experiences as the candle burns.
Custom fragrance blending transforms candle making into olfactory art. Start with a concept (woodsy, floral, citrus, earthy) and select complementary oils. Use the perfumer's pyramid structure: top notes (first impression, quick evaporation), middle notes (heart of the scent), and base notes (lasting foundation). Test small batches extensively since fragrance behavior in wax differs from raw oil scent.
Botanical embedding adds visual interest but requires careful execution. Dried flowers, herbs, or other plant materials must be completely enclosed in wax to prevent fire hazards. Place botanicals against container sides for visibility, then pour wax carefully to encapsulate them fully. Never leave plant material exposed above the wax surface or near the wick.
Wooden wicks create distinctive crackling sounds while burning and offer aesthetic differentiation. They require different sizing calculations than cotton wicks and may need trial and error to achieve optimal performance. The wider flame footprint can improve scent throw in certain wax types.
Research institutions like RIFM provide scientific resources on fragrance safety and indoor air quality that inform advanced formulation decisions. Understanding the science behind scent dispersion and inhalation exposure helps create products that perform beautifully while maintaining safety standards.
Where can I learn more about botanical candle making?
Learning resources include hands-on workshops, online courses, candle making books, supplier educational materials, and community forums where experienced makers share knowledge. Combining multiple learning methods accelerates skill development and exposes you to diverse techniques.
Local workshops provide immediate feedback and tactile learning impossible to replicate through digital resources alone. Manhattan-based makers can explore neighborhood artisan studios and specialty shops that occasionally offer classes. The hands-on environment lets beginners ask questions in real-time and observe expert techniques directly.
Online platforms host comprehensive courses ranging from beginner fundamentals to advanced formulation chemistry. Look for courses teaching botanical and natural candle making specifically rather than general craft candle content if your focus is plant-based ingredients.
Recommended learning approaches:
- Start with supplier tutorials (most wax and fragrance suppliers publish detailed guides)
- Join online candle making communities for peer support
- Invest in one comprehensive reference book
- Document every batch with notes on materials, temperatures, and results
- Attend at least one in-person workshop if available locally
Books provide structured information and reference material for troubleshooting specific issues. Select recent publications since candle making techniques and materials have evolved significantly in the past decade, particularly regarding natural and botanical formulations.
Testing remains the most valuable teacher. Make small batches with single variable changes to understand how each element affects final results. This methodical approach builds intuitive understanding that surpasses theoretical knowledge alone.
Frequently Asked Questions
How long do homemade scented candles last?
Homemade scented candles last approximately one hour per ounce of wax when burned properly. An eight-ounce candle typically provides 40-50 hours of burn time depending on wick size, wax type, and burning practices. Proper wick trimming and limiting burn sessions to 3-4 hours maximizes longevity and maintains optimal performance throughout the candle's life.
Can I use essential oils instead of fragrance oils?
You can use essential oils in homemade candles but they require higher concentrations (10-12% versus 6-10% for fragrance oils) and some evaporate quickly when heated, resulting in weaker scent throw. Certain essential oils like citrus have low flash points making them less suitable for candle making. Pure botanical extracts offer natural alternatives though cost considerations and scent intensity vary significantly between oil types.
How do I know what size wick to use?
Wick size depends on container diameter, wax type, and fragrance load. As a general guideline, containers 2.5-3 inches wide require small wicks, 3-4 inches need medium wicks, and larger containers need correspondingly bigger wicks. Manufacturers provide sizing charts, but testing remains essential since fragrance oils affect burn characteristics. The first burn should create a complete melt pool across the entire surface within 3-4 hours.
Why doesn't my candle smell strong when burning?
Weak scent during burning typically results from insufficient fragrance load, inadequate curing time, incompatible wax and fragrance pairing, or wick issues preventing proper melt pool formation. Increase fragrance to 8-10% by weight, ensure full 1-2 week cure, verify fragrance oil is designed for candle making, and confirm wick creates edge-to-edge melt pool. Each variable contributes to overall scent throw performance.
How long should I wait before burning a homemade candle?
Wait at least 48 hours before burning a homemade candle, though optimal performance requires 1-2 weeks of curing time. During cure, wax and fragrance molecules fully bond, maximizing scent throw and burn quality. While candles are technically safe to burn after solidifying, patience produces noticeably superior results. Mark candles with pour dates and resist testing before adequate cure completion.
Is it cheaper to make candles at home than buy them?
Making candles at home costs less than purchasing premium botanical candles after initial equipment investment. Materials for an 8-ounce soy candle with quality fragrance oil average four to seven dollars, while comparable retail candles often exceed twenty to thirty dollars. Equipment costs (melting pot, thermometer, supplies) require upfront investment but amortize quickly across multiple batches. The calculation shifts when valuing time and skill development involved.
Creating scented candles at home combines practical chemistry with creative expression, resulting in customized products that reflect personal aesthetic preferences and ingredient priorities. Whether you're drawn to botanical formulations, specific vessel styles, or signature scent profiles, the fundamental techniques remain consistent while allowing infinite variation.
If you're in Manhattan and want to experience professionally crafted botanical candles before starting your own journey, or simply prefer supporting local makers who share your commitment to natural ingredients, Haus of Smell hand-pours every candle in NoMad using real plant and resin extracts without synthetic additives. Their vegan, botanical approach demonstrates the quality possible when craftsmanship meets uncompromising ingredient standards, whether you're making candles yourself or choosing carefully made options from dedicated artisans.